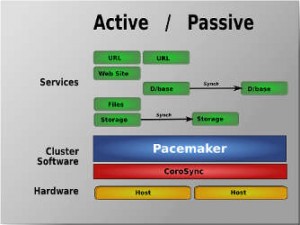
I have been using Linux Cluster Engine called Corosync and Linux Cluster Resource Manager called Pacemaker for a while now and must say i am very satisfied with it. Corosync and Pacemaker combined can turn your Linux boxes into a Linux High Availability Cluster.
Corosync and Pacemaker Linux Cluster of course supports both Active/Passive and Active/Active modes on multi-nodes!

This is the first part of my “Linux Cluster” posts:
- Linux Cluster Part 1 – Install Corosync and Pacemaker on CentOS 6 – Learn how to install Corosync and Pacemaker on CentOS 6
- Linux Cluster Part 2 – Adding and Deleting Cluster Resources – Learn how to add and delete Linux Cluster Resources and how to use CRM Shell
- Linux Cluster Part 3 – Manage Cluster Nodes and Resources – Learn how to manage Linux Cluster Nodes (maintenance mode, standby mode, …) and Linux Cluster Resources (resource constraints – order, colocation, …)
Corosync
Corosync is an open source Cluster Engine. It is actually a Communication System that enables two or more Linux Cluster nodes to transfer information between them. Corosync is constantly listening on configured port number where Linux Cluster nodes are sending information. Corosync Communication System enables all of the nodes to know the exact state of each other at all time. In case one of the Linux Cluster nodes fails this information will be immediately transferred to other still exsisting Linux Cluster nodes.
Pacemaker
Pacemaker is an open source high availability Resource Manager. As the name says, Pacemaker manages resources. Pacemaker enables detection and recovery of application and machine failures. Pacemaker holds the configuration of all Resources Linux Cluster will manage as also all relations between the Machines and Resources. In case one of the Linux Cluster nodes fails Pacemaker will detect this and start configured Resources on one of the othe available Linux Cluster nodes.
Let’s learn how to Install and Configure Linux Cluster!
In the following steps we will configure a two node Linux Cluster – multiple node Linux Cluster is also available with Corosync and Pacemaker.
1. DNS resolution
Make sure you have successfully set up DNS resolution and NTP time synchronization for both your Linux Cluster nodes.
2. Add repository
Add HA-Clustering Repository from OpenSuse on both nodes! You will need this Repository to install CRM Shell, to manage Pacemaker resources:
/etc/yum.repos.d/ha-clustering.repo
[haclustering]
name=HA Clustering
baseurl=http://download.opensuse.org/repositories/network:/ha-clustering:/Stable/CentOS_CentOS-6/
enabled=1
gpgcheck=0
3. Install packages
Install Corosync, Pacemaker and CRM Shell. Run this command on both Linux Cluster nodes:
/usr/bin/yum install pacemaker corosync crmsh -y
4. Create configuration
Create Corosync configuration file which must be located in “/etc/corosync/” folder. You can copy /paste the following configuration and edit the “bindnetaddr: 192.168.1.100” to the IP address of your first Linux Cluster node:
/etc/corosync/corosync.conf
compatibility: whitetank

aisexec {
    # Run as root - this is necessary to be able to manage resources with Pacemaker
    user: root
    group: root
}

service {
    # Load the Pacemaker Cluster Resource Manager
    ver: 1
    name: pacemaker
    use_mgmtd: no
    use_logd: no
}

totem {
    version: 2
    #How long before declaring a token lost (ms)
        token: 5000
    # How many token retransmits before forming a new configuration
        token_retransmits_before_loss_const: 10
    # How long to wait for join messages in the membership protocol (ms)
        join: 1000
    # How long to wait for consensus to be achieved before starting a new
    # round of membership configuration (ms)
        consensus: 7500
    # Turn off the virtual synchrony filter
        vsftype: none
    # Number of messages that may be sent by one processor on receipt of the token
        max_messages: 20
    # Stagger sending the node join messages by 1..send_join ms
        send_join: 45
    # Limit generated nodeids to 31-bits (positive signed integers)
        clear_node_high_bit: yes
    # Disable encryption
        secauth: off
    # How many threads to use for encryption/decryption
        threads: 0
    # Optionally assign a fixed node id (integer)
    # nodeid: 1234interface {

        interface {
            ringnumber: 0
            # The following values need to be set based on your environment
                bindnetaddr: 192.168.1.100
                mcastaddr: 226.94.1.1
                mcastport: 5405
                ttl: 1
        }
    }

logging {
    fileline: off
    to_stderr: no
    to_logfile: yes
    to_syslog: yes
    logfile: /var/log/cluster/corosync.log
    debug: off
    timestamp: on

logger_subsys {
    subsys: AMF
    debug: off
    }
}

amf {
    mode: disabled
}
Copy Corosync configuration file to the second Linux Cluster node and edit the “bindnetaddr: 192.168.1.100” to the IP address of your second Linux Cluster node.
5. Generate Auth Key
Generate Corosync Authentication Key by running “corosync-keygen” – This might take some time!. The key is located in “/etc/corosync” directory, file is named “authkey”:
[root@foo1 /]# corosync-keygen
Corosync Cluster Engine Authentication key generator.
Gathering 1024 bits for key from /dev/random.
Press keys on your keyboard to generate entropy.
Press keys on your keyboard to generate entropy (bits = 176).
Press keys on your keyboard to generate entropy (bits = 240).
Press keys on your keyboard to generate entropy (bits = 304).
Press keys on your keyboard to generate entropy (bits = 368).
Press keys on your keyboard to generate entropy (bits = 432).
Press keys on your keyboard to generate entropy (bits = 496).
Press keys on your keyboard to generate entropy (bits = 560).
Press keys on your keyboard to generate entropy (bits = 624).
Press keys on your keyboard to generate entropy (bits = 688).
Press keys on your keyboard to generate entropy (bits = 752).
Press keys on your keyboard to generate entropy (bits = 816).
Press keys on your keyboard to generate entropy (bits = 880).
Press keys on your keyboard to generate entropy (bits = 944).
Press keys on your keyboard to generate entropy (bits = 1008).
Writing corosync key to /etc/corosync/authkey.
Transfer the “/etc/corosync/authkey” file to the second Linux Cluster node.
6. Start Corosync service on both nodes:
[root@foo1 /]# service corosync start
Starting Corosync Cluster Engine (corosync):               [  OK  ]
[root@foo2 /]# service corosync start
Starting Corosync Cluster Engine (corosync):               [  OK  ]
7. Start Pacemaker service on both nodes:
[root@foo1 /]# service pacemaker start
Starting Pacemaker Cluster Manager:                        [  OK  ]
[root@foo2 ~]# service pacemaker start
Starting Pacemaker Cluster Manager:                        [  OK  ]
8. Check cluster status
After a few seconds you can check your Linux Cluster status with “crm status” command:
[root@foo1 /]# crm status
Last updated: Thu Sep 19 15:28:49 2013
Last change: Thu Sep 19 15:11:57 2013 via crmd on foo2.geekpeek.net
Stack: classic openais (with plugin)
Current DC: foo1.geekpeek.net - partition with quorum
Version: 1.1.9-2.2-2db99f1
2 Nodes configured, 2 expected votes
0 Resources configured.

Online: [ foo1.geekpeek.net foo2.geekpeek.net ]
As we can see the status says 2 nodes are configured in this Linux Cluster – foo1.geekpeek.net and foo2.geekpeek.net. Both nodes are online. Current DC is foo1.geekpeek.net.
NEXT STEP is to configure Pacemaker resources – applications, IP addresses, mount points in the cluster. I will be covering Pacemaker resource configuration in the next post soon. Stay tuned in!

Pingback: Linux Cluster Part 2 - Adding and Deleting Cluster Resources | GeekPeek.Net()
Pingback: Linux Cluster Part 3 - Manage Cluster Nodes and Resources | GeekPeek.Net()
Pingback: How to Install DHCP Server on CentOS 6 | GeekPeek.Net()
Pingback: Linux Cluster Part 3 - Manage Cluster Nodes and Resources - GeekPeek.Net()
Pingback: Linux Cluster Part 2 - Adding and Deleting Cluster Resources - GeekPeek.Net()
Pingback: Linux Cluster Software |()